

Leather Courses Britain
Following a rather long train journey from London (telling every single person in an Arriva uniform on the way I had a request stop through fear of missing it), I finally arrived at Narberth.
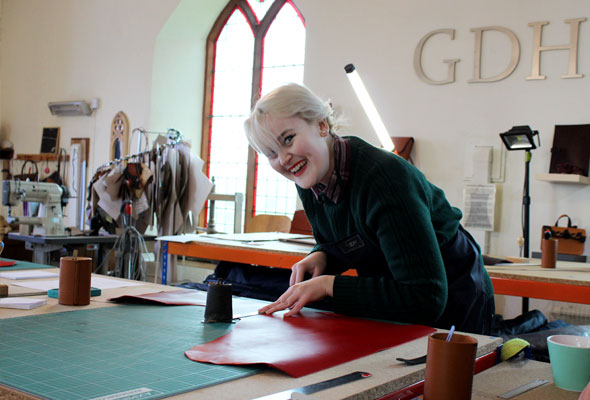
Hearing the wind and drizzle outside, with a cup of tea and biscuits, the smell of good quality leather, and a roaring fire, the chapel is a cosy little haven.
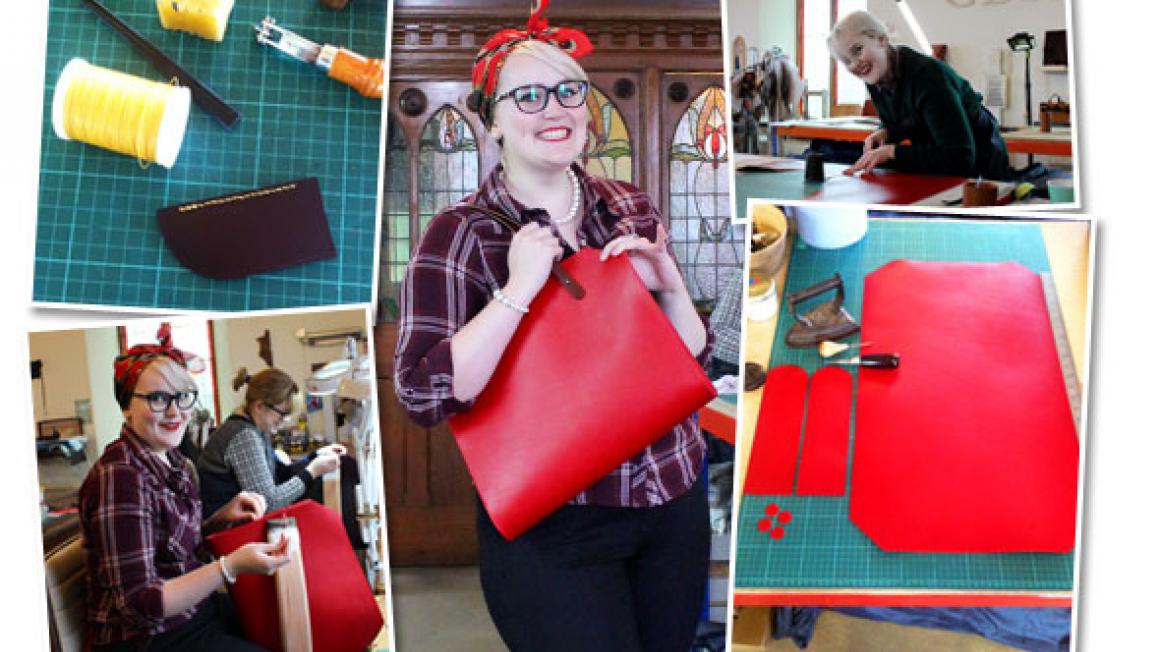
 Cutting out the leather
But I'm not at the chapel to worship. I would be spending the next two days with Gaynor Davies Howell of Leather Courses Britain, learning to make my very own leather handbag from scratch in her delightful converted chapel. So maybe you could say it is worship, but worshiping the god of fashion as opposed to the almighty.
Gaynor has been running traditional leather handbag (she also runs a course on making masks) making courses since 2007.
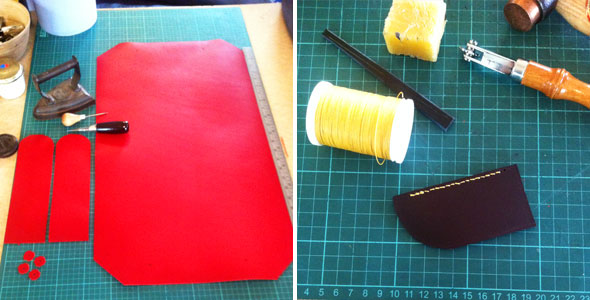 From left: All my pieces cut out and ready. My practise stitching
The smell of the vegetable tan leather combined with the crackle and popping of the log burner, my cup of tea and Gaynor's sunny disposition make me feel completely at home and I can't wait to get started with my bag.
After a health and safety briefing I pop on my apron and start with the first task. Picking what type of bag and what colour. There is a choice of satchel, messenger or tote and luckily Gaynor has some she made earlier (in true Blue Peter style) to look at before deciding. But being a lover of handbags, this is obviously quite a decision. The two ladies on the course with me have decided both their styles and colours whilst I'm still umming and ahhing.
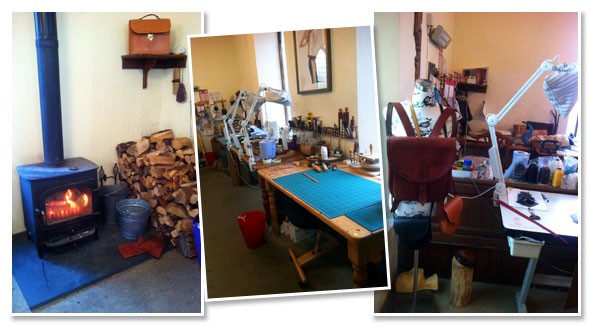 Gaynor's workshop with it's cosy crackling fire
Finally I settle on a red tote bag with dark brown leather handles – it was inevitable really, wearing red nail varnish, red lippie and having a red flower in my hair, I don't know what took me so long to reach the obvious choice!
Next is to cut the pattern out. Before putting knife to leather we use a tool called a scratch awl to trace around the pattern onto the leather. Then, using a ruler and knife you simply follow your lines and cut out the pieces.
 Gluing the edge ready to stick the gusset on
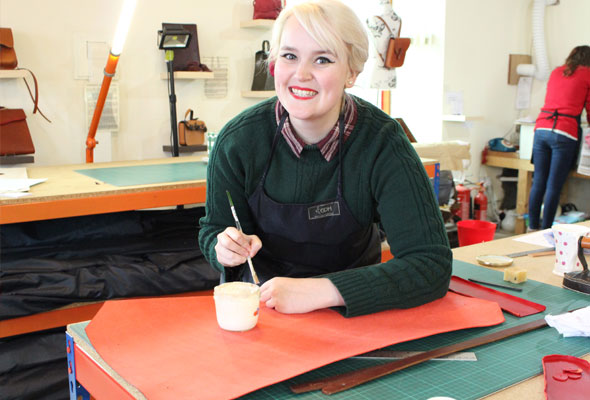
The exposed edges are then dyed and burnished –burnishing entails using a solution on the edging then essentially polishing the area the solution is applied to, to seal the edges. This process also leaves the edges with a great shine.
The straps are cut from a slightly tougher piece of leather. The edges are then shaved to create a smooth edge so it will sit comfortably on the shoulder. The straps will be attached to the bag with studs so we punch a hole (yes, I'm let loose with a hammer) in the leather ready for when we attach them to the bag.
 Once the gusset is stuck on it is secured in place with clips and left to dry
Lunch is spent sitting around the fire with a healthy (or unhealthy depending on which way you look at it – I love cake so I'd go with healthy) selection of tea, cakes, biscuits and fruit, and the chance to chat to the other ladies on the course. It really is such a lovely, friendly, welcoming atmosphere. I've always been quite happy to go things alone but if you're thinking about going and are worried you don't have someone to go with, well I really wouldn't worry.
After lunch it's time to think about stitching. Using a pricking iron (it looks very similar to a fork) we mark out where the stitches will be on the bag. One they are marked we glue one of the gussets onto the bag. This will be left to dry overnight and we will begin stitching in the morning.
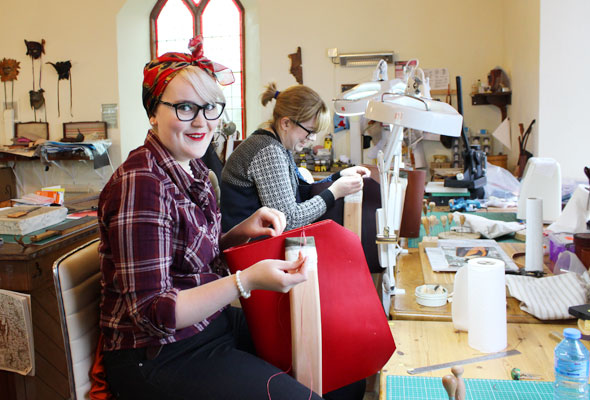 Stitching time!
I must admit, despite being pretty handy with a thread and needle (I really did used to make some fabulous fancy dress outfits at university), I'm worried about the neatness of my stitching. Luckily, before we stitch the real thing we get a go on a practise piece.
We thread two needles, coating the cotton in beeswax for smoothness and added strength. The leather is held in a stitching clam and then an awl is used to make holes in the leather, using marks made be the pricking iron as a guide.
 From left: Gluing the studs in place, the paper stops the glue dripping on the leather. Straps attached!
Not wanting to congratulate myself too much, but I do find my practise piece is pretty good and am eager to get my hands on my actual bag on day two of the workshop.
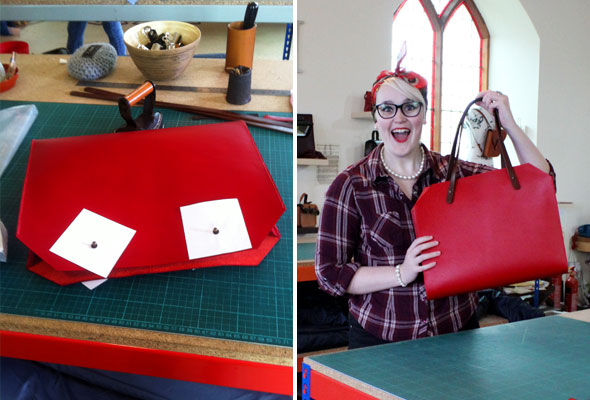
Stitching, I think, is incredibly therapeutic. The next day, in no time at all I find I've stitched my whole bag together. All that's left is to sand the edges, burnish and then attach the handles. It's exciting how quickly two days of hard work comes together, but I am a bit sad it's all over.
 I'm really quite chuffed with the finished product
I've always loved making things from scratch; I find the idea of learning a new skill absolutely thrilling, and I must say, despite a few steps which had me shouting to Gaynor or one of her team for help, I loved every single minute of the course.
By the end of the weekend I have a beautiful, hand-made-by-moi bag which I can't wait to use. The only thing I have to remember is during the first six months of use I must not get it wet.
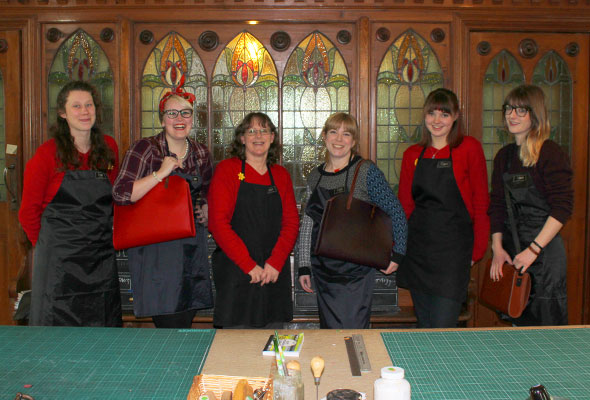 Gaynor (third from the left), her team, and us girls with our new arm candy
Back in London, bag now in full use, I find my work colleagues incredibly jealous, friends asking if I can make them one, and strangers on the tube telling me they love my bag. Telling people I made it myself makes me feel incredibly proud, and if I'm honest, a bit smug!
Suitable for all levels, from beginner to dab hands, I cannot recommend this course enough. In fact, I'm already saving so I can go along and add another handmade handbag to my collection.
www.leathercoursesbritain.com
Hearing the wind and drizzle outside, with a cup of tea and biscuits, the smell of good quality leather, and a roaring fire, the chapel is a cosy little haven.
Cutting out the leather But I'm not at the chapel to worship. I would be spending the next two days with Gaynor Davies Howell of Leather Courses Britain, learning to make my very own leather handbag from scratch in her delightful converted chapel. So maybe you could say it is worship, but worshiping the god of fashion as opposed to the almighty.
Gaynor has been running traditional leather handbag (she also runs a course on making masks) making courses since 2007.
From left: All my pieces cut out and ready. My practise stitching The smell of the vegetable tan leather combined with the crackle and popping of the log burner, my cup of tea and Gaynor's sunny disposition make me feel completely at home and I can't wait to get started with my bag.
After a health and safety briefing I pop on my apron and start with the first task. Picking what type of bag and what colour. There is a choice of satchel, messenger or tote and luckily Gaynor has some she made earlier (in true Blue Peter style) to look at before deciding. But being a lover of handbags, this is obviously quite a decision. The two ladies on the course with me have decided both their styles and colours whilst I'm still umming and ahhing.
Gaynor's workshop with it's cosy crackling fire Finally I settle on a red tote bag with dark brown leather handles – it was inevitable really, wearing red nail varnish, red lippie and having a red flower in my hair, I don't know what took me so long to reach the obvious choice!
Next is to cut the pattern out. Before putting knife to leather we use a tool called a scratch awl to trace around the pattern onto the leather. Then, using a ruler and knife you simply follow your lines and cut out the pieces.
Gluing the edge ready to stick the gusset on The exposed edges are then dyed and burnished –burnishing entails using a solution on the edging then essentially polishing the area the solution is applied to, to seal the edges. This process also leaves the edges with a great shine.
The straps are cut from a slightly tougher piece of leather. The edges are then shaved to create a smooth edge so it will sit comfortably on the shoulder. The straps will be attached to the bag with studs so we punch a hole (yes, I'm let loose with a hammer) in the leather ready for when we attach them to the bag.
Once the gusset is stuck on it is secured in place with clips and left to dry Lunch is spent sitting around the fire with a healthy (or unhealthy depending on which way you look at it – I love cake so I'd go with healthy) selection of tea, cakes, biscuits and fruit, and the chance to chat to the other ladies on the course. It really is such a lovely, friendly, welcoming atmosphere. I've always been quite happy to go things alone but if you're thinking about going and are worried you don't have someone to go with, well I really wouldn't worry.
After lunch it's time to think about stitching. Using a pricking iron (it looks very similar to a fork) we mark out where the stitches will be on the bag. One they are marked we glue one of the gussets onto the bag. This will be left to dry overnight and we will begin stitching in the morning.
Stitching time! I must admit, despite being pretty handy with a thread and needle (I really did used to make some fabulous fancy dress outfits at university), I'm worried about the neatness of my stitching. Luckily, before we stitch the real thing we get a go on a practise piece.
We thread two needles, coating the cotton in beeswax for smoothness and added strength. The leather is held in a stitching clam and then an awl is used to make holes in the leather, using marks made be the pricking iron as a guide.
From left: Gluing the studs in place, the paper stops the glue dripping on the leather. Straps attached! Not wanting to congratulate myself too much, but I do find my practise piece is pretty good and am eager to get my hands on my actual bag on day two of the workshop.
Stitching, I think, is incredibly therapeutic. The next day, in no time at all I find I've stitched my whole bag together. All that's left is to sand the edges, burnish and then attach the handles. It's exciting how quickly two days of hard work comes together, but I am a bit sad it's all over.
I'm really quite chuffed with the finished product I've always loved making things from scratch; I find the idea of learning a new skill absolutely thrilling, and I must say, despite a few steps which had me shouting to Gaynor or one of her team for help, I loved every single minute of the course.
By the end of the weekend I have a beautiful, hand-made-by-moi bag which I can't wait to use. The only thing I have to remember is during the first six months of use I must not get it wet.
Gaynor (third from the left), her team, and us girls with our new arm candy Back in London, bag now in full use, I find my work colleagues incredibly jealous, friends asking if I can make them one, and strangers on the tube telling me they love my bag. Telling people I made it myself makes me feel incredibly proud, and if I'm honest, a bit smug!
Suitable for all levels, from beginner to dab hands, I cannot recommend this course enough. In fact, I'm already saving so I can go along and add another handmade handbag to my collection.
www.leathercoursesbritain.com